​WorkStation Navigation

The exact appearance of your WorkStation will depend on the specific needs of your organization and the unique configuration applied by the site administrator.  There are features within the site to assist with navigation.

All WorkStations have a "ribbon" across the top that looks like this:

​​topbar2.jpg

Most WorkStations feature a Top Link Bar along the top of the page and a Quick Launch navigation list along the left. These two items help you navigate around the site. As a rule, the Top Link bar will take you to other sites in the site collection and the Quick Launch Navigation on the left will take you to document libraries, calendars, lists, etc. within the current site you are on.


topnav.jpg

quick_launch.jpg

Most of the time, you'll be able to find what you want on your site from the Quick Launch on the left hand side, but sometimes things are 'hidden' (someone forgot to make a navigation link).  You can always find out where things are by going to Site Contents (either at the bottom of the Quick Launch or from the cog dropdown menu in the upper right hand corner of your site.


​​​​​​​ ​Top Right Menu​

(back to Site User Help)                   (back to Site Owner Help)

This is a major menu that will follow you throughout every page. This menu includes the social aspect of your site, other page settings and most importantly, your site settings! We won't go through every option you have there, because it can get very complicated.

tr1.JPG 


​Let's start with the social choices: (We'll go over these in more detail later in this document)

  • Newsfeed:  This is your My Site Newsfeed where you will see the news coming from the sites you are following. My Site is the social aspect of SharePoint that allows you to be informed and interact with what's relevant to you in SharePoint.
  • Follow: You click on this button when you are on a site you would like to follow. (it will then show up in your Sites list (when you click on 'Sites')
  • Sites: This displays all the sites you are following (see 'Follow' above)

(back to Site User Help)                  

sitecontents.JPG 

(back to Site User Help)

​Top Link Navigation


(back to Site Owner Help)

The top link bar provides a way for users of your site to get to other sites on the WorkStation by displaying a row of tabs at the top of every page in the site. When you create a new site, you choose to feature the site on the top link bar of the parent site and whether to use the top link bar of the parent site. By default, when you create a new site, the site appears on the top link bar of the parent site and is named to match the Title created for the site.


When you first create a new site, you will be asked if you want to use the same top link bar as the parent site (the default is to NOT use the same top link bar), but you can change that. 

navigationinheritance2.JPG 

You can also change the top link bar by going to Site settings > Navigation and work with the Global Navigation section

globalnav.JPG 

and it can be refined even further using the Structural Navigation section

structuralnav_toplink.JPG 

Or you can edit with the EDIT LINKS icon right from the top link bar

editlinks.JPG
(back to Site Owner Help)

​Customizing the Quick Launch

(back to Site Owner Help)

The Quick Launch is displayed on the left hand side of each WorkStation and contains links to featured lists, libraries, sites and links external to the WorkStation. You are able to choose which lists/libraries (or other links) appear in the Quick Launch menu. 

quicklaunch3.JPG
 

Home: Brings you to the Home Page of your site (main page)

Documents: Shows the main document library that you can also see inside your Home Page (+ new document). You can directly upload a new document there.

Recent: If you haven't done anything yet, you are not supposed to see any link there. However, when you will create a new list or library, the link to this new app will appear under "Recent" in the menu and you will be able to access to it quickly.

Site Contents:This is like your Site Map where you can see all the content you already have on your site. Even if you haven't created anything in it yet, every list or library you'll create next will appear there automatically.

You can change what appears on the Quick Launch by going to the Site Settings menu of your Workstation.  (Site Settings > Navigation)

sitesettingsnavigation.JPG 

The current navigation section pertains to the Quick Launch menu

currentnavigation.JPG 

And the Structural Navigation section allows you to customize the Quick Launch even further

structuralnav_quicklaunch.JPG 

You can also change what's on the Quick Launch by going to the list/library settings of the specific list/library you want to have on the quick launch.  (Library/List Settings > List name, description and navigation)

nav1a.JPG 

nav1b.JPG
When you first create a new list or library, on the list or library settings page under Navigation, you will find the option to display the new list/library on the Quick Launch.  The default option is to NOT display the new list/library on the Quick Launch, but you can change that setting for each list or library according to your preference.


Finally, you can also change what's on your Quick Launch by clicking the EDIT LINKS icon at the bottom of the Quick Launch

ql1.JPG
(back to Site Owner Help)

Making Drop Down menus on the top link bar

​ (back to Site Owner Help)

Sometimes if you’ve got a lot of links on the top bar, it can start looking crowded and difficult to read and navigate and you may want to organize those a little better.

dd1.JPG 

To do this, go to the cog > Site settings > Navigation

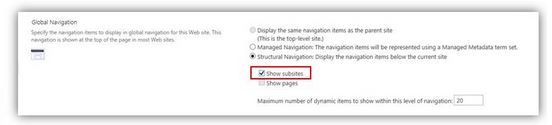
Use the Global Navigation section at the top to decide what it is that you want to show, then use the Structural Navigation section at the bottom to further organize it.

dd2.JPG 

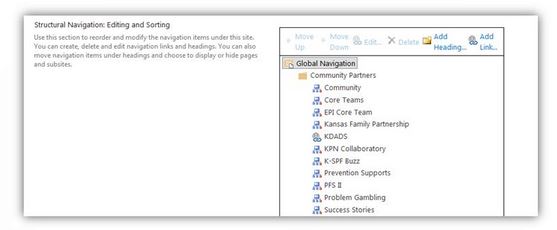
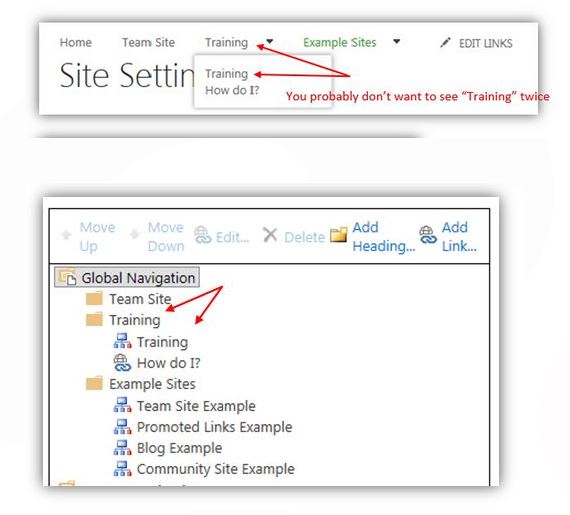
So, you have a site that has several subsites underneath it

dd3.JPG 

There's already one drop down link already on this top link bar but let’s say we want to make another one showing all the example sites below it.

dd4.JPG 

  1.  Cog > Site Settings > Navigation
  2. In the Global Navigation section, you'd need to check Show subsites to get all those subsites to show on the top link bar.

 dd5.JPG

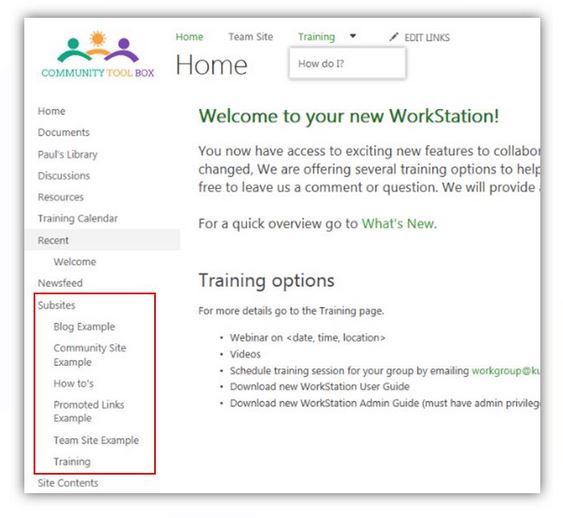
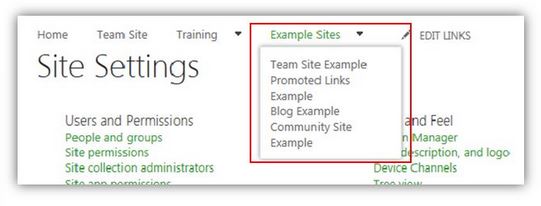
  You can see that that added all those example sites to our top link bar
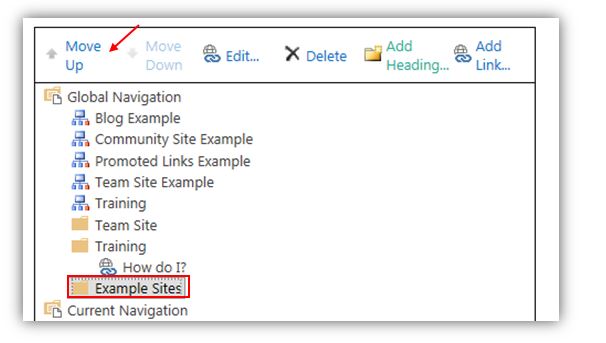
dd6.JPG 

     3. Now, go back to SiteSettings > Navigation and scroll down to the 
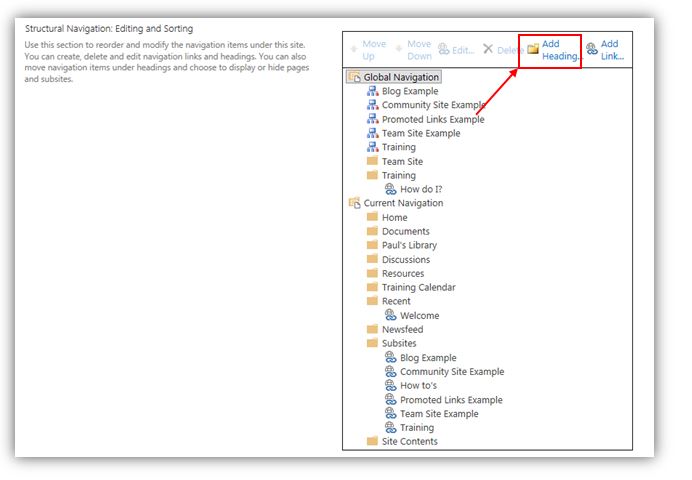
StructuralNavigation: Editing and Sorting section.

      4.  Click Add Heading to create the link that will be the heading for the dropdown list.

addheading.JPG 

      5.  Title the heading and enter the URL (since this is just a heading link and doesn't really need to go 'anywhere', just use the same link as the home page

navheading.JPG 

 So, now that heading is showing in the list.  You can move it up in the list or down in the list as desired.

moveup.JPG 

       6.  Then just move the sites that you want underneath that heading by clicking on the site and clicking Move down until it is under the desired heading.

movedown.JPG 

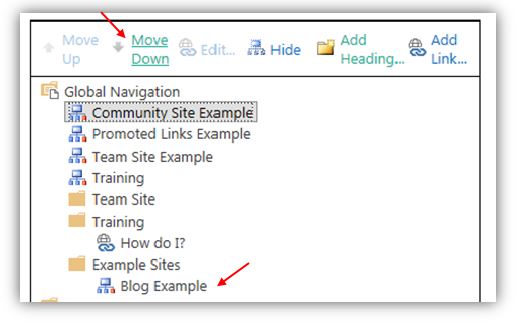
      7.  Continue this until all the sites that you want under that heading are in place.
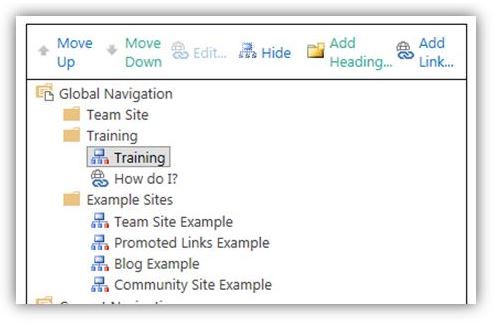
7.JPG 

Click OK.  You now have your subsites showing as a dropdown under that heading.

ok.JPG 

You don’t have to show everything that is there.

2.JPG 

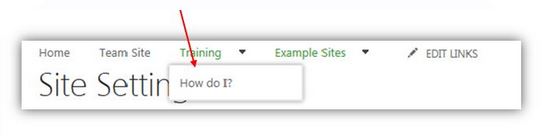
So, just click on the Training subsite link and click Hide

hide.JPG 

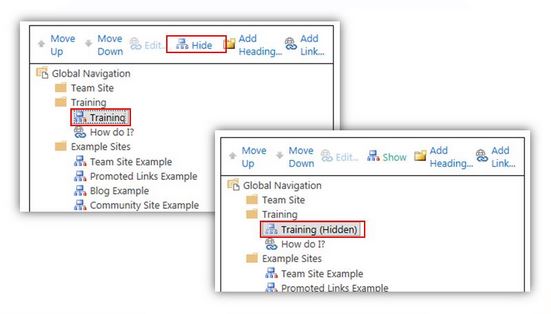
and you can  no longer see it

nolongersee.JPG 

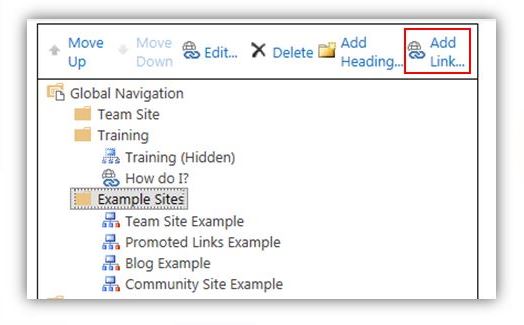
You can also link to other external sites by clicking Add link under the heading and titling it and specifying where it needs to direct to.

directto.JPG 

(back to Site Owner Help)

Hiding Links Based on Permissions

(back to Site Owner Help)


​You can use the Audience field to create links that only certain users can see. 

hide1.JPG 

For example, let’s say you had a page in your workstation that you only wanted Site Owners to be able to see.

hide2.JPG 

You want to create a link at the top that will display this link to Site Owners, but you don’t want your standard end users to see the link. 

Go to Site settings > Navigation and Add link

hide3.JPG 

​Title the link and add the url to that page.  Then click on the browse icon next to the audience field

hide4.JPG 

Choose how you want to filter it

hide5.JPG 

hide6.JPG 

Select the appropriate group, click Add > OK

addusers.JPG 

So, now, if you are in the Site Owners group, then you can see the link

seelink.JPG 

But if you're NOT in that Site Owners group, you will NOT be able to see the link

dontseelink.JPG 

*Note:  This only hides the link for those not in the group allowed to see it.  If you really had that super secret page, you would want to set permissions on that page as well…only giving Site Owners permission to see it.  If you don't do that, someone still might be able to find that page even without the link. 

**Another note: This can also be done with the Quick Launch links on the left navigation.

(back to Site Owner Help)

New Item Link Missing on Page

(back to Site Owner Help)

If you encounter a library page (documents, contacts, etc.) that is missing the link to create a new items, follow these instructions to restore that link.

  • Go to the cog menu and select Edit page
  • Click into the web part, select the down arrow and Edit Web Part
  • Under List Views change Toolbar Type to No Toolbar
  • Click Apply
  • Change Toolbar Type to Full Toolbar
  • Click Ok.​

You should now have a link that allows you to add a new item. 

(back to Site Owner Help)

Editing Promoted Links

(back to Site Owner Help)
When you're in the Promoted Links library and you want to edit the links (either add more, change images, etc.) – click on the List Tab on the top ribbon.  The default view is Tiles – switch it to All Promoted Links

That will bring you back to the list view where you can edit

(back to Site Owner Help)

Promoted Links​

​Adding promoted Links to your Site

(back to Site Owner Help)

Promoted Links are set of tiles that link to other places either in your site or externally.  They are the standard set of tiles that come up when you first create your site:


As you hover over them, you can see detailed information about the tile (and where it will take you):


To add your own custom tiles to your site:

Go to Site Contents > add an app

Find the Promoted Links list in the lists available to you.


Name your list and click Create

​​

You now have your promoted links in your Site Contents:


Enter a Title


  • Title: *required field
  • Background image Location - Enter the url to the background image.  If you leave this blank, the tile will just have a solid color background
  • Type the description (highlighted above) – enter what you want the display name to be – if you leave this blank, you will see the actual URL 
  • Description – more information can be added here – which will show when user hovers over the tile
  • Link Location: This is where you want the tile to direct to (url and display name)
  • Launch Behavior – do you want it to open in the current window, in a new tab or …
  • Order: Order of the tiles                                                                 ​

After you've created your links, you will have some link tiles:

If you hover over it, you can see the description


And if you click on it, it will take you wherever you specified it to take you (in this example…facebook).

As previously stated, if you don't put in a url to a background image, you'll just have a solid color background: (but the link will still work)​


(back to Site Owner Help)