​WorkStation Overview

​​

(back to Site User Help)

Welcome to your WorkStation, an interactive and customizable online support system for your community work.  This WorkStation was developed to provide you with tools to improve collaboration with colleagues on important community issues and goals.

The WorkStation provides an online location for sharing documents, information and ideas, with integrated supports for building capacity, documenting and evaluating efforts, and co-learning within and among community initiatives.  There are many collaborative features of the WorkStations, including access to shared documents, contact lists, expert guidance, success stories and participatory evaluation and reporting.

WorkStations are dynamic and interactive.  It is our hope these collaborative tools prove to be powerful supports for your community health and development efforts.

Understanding Your WorkStation

It may be helpful to understand the hierarchies and layout before you begin using your WorkStation.

workstation.JPG 

Web Parts are the elements that appear on webpages with pre-determined purposes that serve specific functions. Examples of Web Parts include: Contacts (where you can list contact names, numbers, e-mail addresses for your group's members) and Announcements (where you can post timely information for the review by users).  

Web Parts serve as windows into Lists or Libraries, which constitute your actual data (e.g., contact names and numbers viewed through the Contacts Web Part, or Word documents viewed through the Shared Documents Web Part). This is the most important concept to understand about WorkStations:

Lists and Libraries are homes for data, and Web Parts are merely windows into those homes. Without Lists or Library of actual data to look at, the Web Part templates will be empty page elements.

Each WorkStation will feature a unique setup, which may evolve over time as your coalition utilizes the site.  Understanding these features will support adaptation to these changes.

(back to Site User Help)


WorkStation Template Overview

(back to Site Owner Help)

WorkStations have endless capabilities for layouts and features, all customizable by you, the site Owner. You can select from any of the many templates available and customize it to fit your specific needs.  You can customize your sites by using templates with standard web parts, but even if you start with a blank site, you can always add the tools and features you need by using the Site Actions tab to "Create" or "Edit Page".

SharePoint 2013 offers a vast variety of out-of-the-box site templates.  One of the success factors of your site is choosing the most suitable site template that meets your needs. 

Here is a quick overview of all the available SharePoint 2013 site templates and their common uses.

On the Collaboration tab:

  • Team Site: This is the default option and is the one that is used the most.  This template is mainly used by teams to collaborate, organize, create and share information and documents.

teamtemplate.JPG 

  • Blog: This template has all the resources necessary for your group to start a blog - a site on which a user or group of users write opinions and share information

blogtemplate.JPG 

  • Project Site:  this site template is used for managing and collaborating on a project. Project site coordinates project status and all additional information relevant to the project.

projecttemplate.JPG 

  • Community Site:  a site where the community members can explore, discover content and discuss common topics.  This site template promotes discussions between members of the site.  There is also some gamification integrated within the site like assigning badges and pints to members that often answer questions.  It provides an easy way for people in the company to ask questions based on the topic and user popular social techniques like '@' to mention and '#' to tag with categories.

communitytemplate.JPG
 

On the Publishing tab:

  • Publishing Site:  A blank site for expanding your Web site and quickly publishing Web pages. Contributors can work on draft versions of pages and publish them to make them visible to readers. The site includes document and image libraries for storing Web publishing assets.
  • Publishing Site with Workflow: A site for publishing Web pages on a schedule by using approval workflows. It includes document and image libraries for storing Web publishing assets. By default, only sites with this template can be created under this site.
  • Enterprise Wiki: A site for publishing knowledge that you capture and want to share across the enterprise. It provides an easy content editing experience in a single location for co-authoring content, discussions, and project management.

enterprisewiki2.JPG
 (back to Site Owner Help)


Create a WorkStation Subsite

​ (back to Site Owner Help)


NOTE: If you have Publishing turned on for your main site then these instructions will not work for you. Please contact the KU Work Group at toolbox@ku.edu​ to have your subsite created for you.


Using the Administration menu, you can create a new WorkStation subsite.

If you select Site Contents from the Administration menu, it will show you a list of what is currently on the site. 

site1.JPG 

Under Subsites, click on new subsite

site2.JPG 

A new page will open and prompt you through the site setup:

newsite4.JPG 

Title and Description - Enter the title and description of your new site.  Information entered here will be shown at the top of the site

Web Site Address - Users can navigate to your site by typing the Web site address (URL) into their browser. You can customize the last part of the address. It is recommended you use lowercase and no spaces. For example,   http://myctb.com/wst/communityhealth/sitename

site4.JPG ​

Template Selection - Select the template for the site.  An overview of the specific elements each template are provided in the next section.

site5.JPG 

Permissions - When you create the new site, you can either choose to give permission to the same users who have access to the parent site, or you can give permission to a unique set of users by selecting Use unique permissions

site6.JPG 

Navigation - Specify if links to this site will appear in the Quick Launch and Top Link Bar of the parent site

Navigation Inheritance - Specify if this site uses the same Top Link Bar as the parent site.

site7.JPG 

 (back to Site Owner Help)

WorkStation Administrator Tools

(back to Site Owner Help)

As a Site Owner, you have access to administrative tools that users of the WorkStation will not see when visiting the site.


The administrative menu is located under the cog in the upper right hand corner of the site.  When you click on the cog, you will have a drop-down of menu choices:

tr2.JPG 

  • Shared with:  Administrators can share the site, list/library or item/file with other users
  • Edit Page:  Add, delete or modify web parts.
  • Add an app: Add apps to provide additional functionality on your site.
  • Site Contents: Shows you all the pages on your site.
  • Change the look: Allows you to pick other color themes for your site.
  • Site settings: The full administrative menu for the workstation.
  • Getting started: Shows you options to help get started. You can turn this off when you no longer need this help.

tr3.JPG 

getstarted.JPG 

 (back to Site Owner Help)

​Understanding the basic SharePoint Interface

(back to Site User Help)              (back to Site Owner Help)

Understanding the basic SharePoint User Interface

SharePoint Ribbon – This is found on every page in your WorkStation.  The 'ribbon' consists of tabs you see at the top of your page.

interface1.JPG
 

Top Link Bar – This has the links to all your different sites, subsites, etc.  This can be customized to fit your needs.

Administration Menu

adminmenu.JPG 

Quick Launch

quicklaunch.JPG 

(back to Site User Help)              (back to Site Owner Help) 

Web Parts

(back to Site Owner Help)

Web Parts are components added to sites that serve as a window into the content stored in lists and libraries. Using Web Parts, you are able to add text, pictures, links, lists and even 
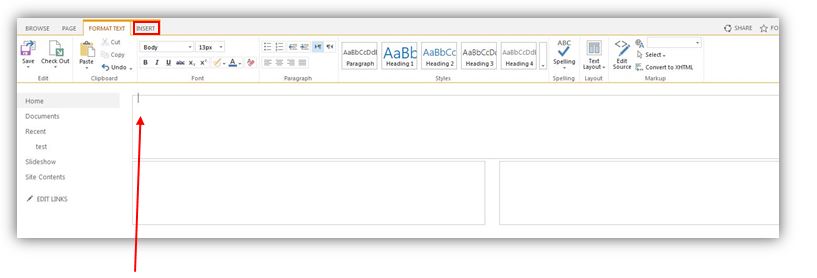
HTML to your WorkStation.

To add a web part, click the cog menu > Edit Page.

Place the cursor in the zone where you’d like to add the web part. 
Then click Insert -> Web Part.

webpart1.JPG
 

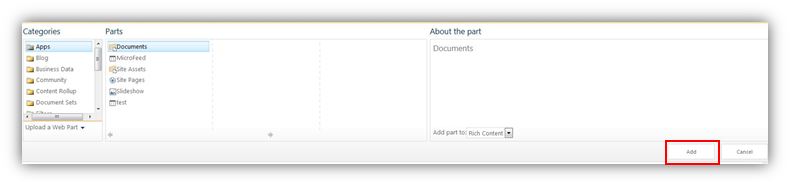
Choose the web part you’d like to add and click Add.  When you select a Web Part, information about the web part is displayed in About the part.

webpart2.JPG
 

Web Parts can quickly be moved within a page with by clicking on the Web Part and dragging it to the new location and dropping it on the page.  Once a web part is added to a page, additional customization is available.  Click Edit Web Part

webpart3.JPG 

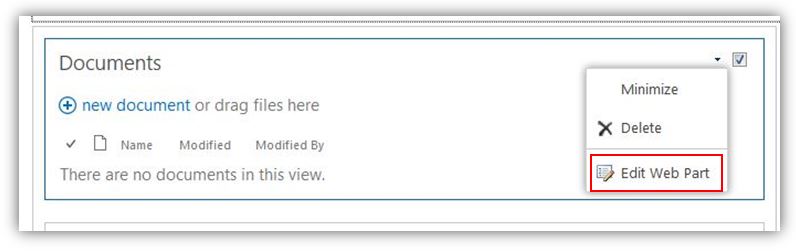
This will open a window on the right-hand side of the page, with a menu of customizations available (which are different depending on the type of library/list it is)

webpart4.JPG


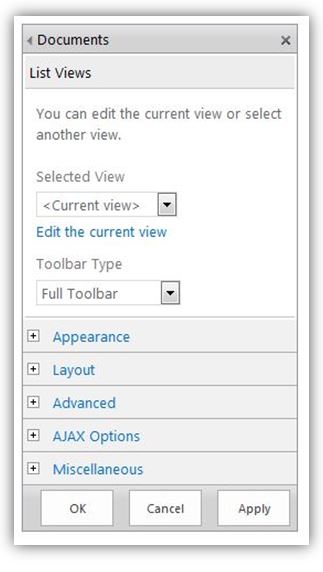
Selected View - This field lets you choose to display one of the List Views available in the drop-down menu, or create a custom layout of the list columns by selecting Edit the current view.    


  • Toolbar Type – This will allow you to customize the toolbar displayed on the Web Part to be a Full Toolbar, Summary Toolbar or No Toolbar     
  • Appearance  
    • Title:  Change the title of your web part
    • Chrome Type:  Change the layout of the web part to feature the title, title only, title and border, border only, or none.     
  • Layout - Control the location of the web part        


Full Toolbar/Summary Toolbar

full toolbar.JPG 

No Toolbar

notoolbar.JPG 


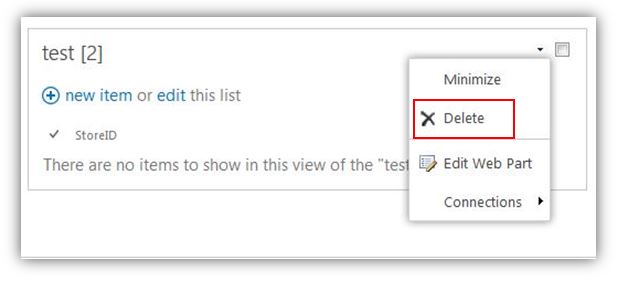
To delete a web part

just click on the dropdown arrow - and choose Delete

Note    This procedure does not delete the Web Part from the site. It only deletes it from the page
deletewebpart.JPG

To minimize or restore a web part

You can configure a Web Part to be minimized by default on a page. You might do this if a page seems crowded. The readers of the page can restore the Web Part while they are reading the page. If they close and then reopen the page, the Web Part will be minimized again.

From a page, look for and click the Edit command

edit3.JPG 

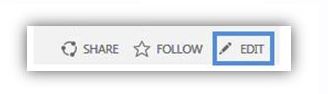
On the page, point to the Web Part, click the down arrow, and then click Minimize. You restore a list or library the same say.

 minimize2.JPG

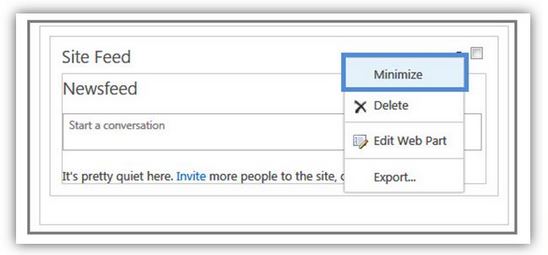
When you have finished, click 
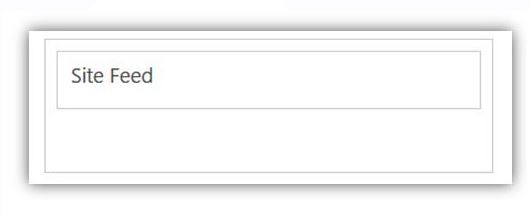
Save.

The following image is an example of a page where the Site Feed web part is minimized.

sitefeed2.JPG 

(back to Site Owner Help)

App Parts vs Web Parts - What is the difference?

(back to Site Owner Help)

parts.JPG 


What is an App Part?

App Part also known as Client Part is one of the three ways in which an app can be presented to an end user. An App Part provides a way to mount an app to SharePoint. It uses an Iframe html element inside a SharePoint page to display the contents of an app. In App Parts, the UI and the app content is generated remotely with the app code running outside of the SharePoint server. This ensures complete isolation between the SharePoint surrounding interface and the embedded app. SharePoint automatically creates an App Part in the Web Part gallery when an app is deployed to SharePoint site.

What is a Web Part?

Web Part is a reusable component or a server side control that can be added inside a SharePoint page. Web Part code runs directly within the SharePoint server. There are several out-of-box Web Parts available in SharePoint and one can also build their own custom Web Parts.  Web Parts are editable, configurable and can even be connected to each other. Also, Web Parts can be utilized within an app.

 Both App Parts and Web Parts are listed in the Web Part gallery from where they can be added in a page. From an end user's perspective, App Part is like a Web Part - both of them provides a way to add a piece of functionality to a page. However, there are primary differences between them in how they are developed and deployed. In App Part, the app code runs outside of the SharePoint while Web Part code runs within SharePoint. So, poorly built apps does not impact SharePoint environment as in case with poorly built Web Parts.

(back to S​ite Owner Help)


​​​